Query q = em.createQuery("select"
    + " u from "+ Usuario.class.getName() + " u"
    + " left join fetch u.unidadeOperacional o"
    + " where u.tfAtivo is true and"
    + " to_char(u.dataNascimento,'Month') like '" +
          LocalDate.now().getMonth().getDisplayName(TextStyle.FULL, Locale.getDefault()) + "%'"
+ " order by u.dataNascimento");sexta-feira, 24 de fevereiro de 2017
JPA: Selecionar mês / Select Month
JPA: Selecionar mês / Select Month
quinta-feira, 16 de fevereiro de 2017
WieldFly / JBoss ARJUNA012117: TransactionReaper::check timeout for TX
A exceção ocorre durante a manipulação de uma grande quantidade de informações, que acaba consumindo muito tempo e excede o default-timeout de 5 minutos.
Solução:
Adicionar a linha abaixo no standalone.xml do WildFly/JBoss,
<coordinator-environment default-timeout="Segundos"/>
Solução:
Adicionar a linha abaixo no standalone.xml do WildFly/JBoss,
<coordinator-environment default-timeout="Segundos"/>
<subsystem xmlns="urn:jboss:domain:transactions:2.0">
    <core-environment>
        <process-id>
            <uuid/>
        </process-id>
    </core-environment>
    <recovery-environment socket-binding="txn-recovery-environment" status-socket-binding="txn-status-manager"/>
    <coordinator-environment default-timeout="3600"/> <!-- 1h -->
</subsystem>
Atenção: Fique atento ao consumo de memória e processamento!
Exemplo de formatação de data com String.format
Calendar data = Calendar.getInstance();

System.out.println("Mes: " + String.format(Locale.getDefault(),"%1$tA, %1$te. %1$tB %1$tY",data) );

System.out.println("Dia da semana: " + String.format(Locale.getDefault(),"%1$tA",data) );

System.out.println("Dia do mês: " + String.format(Locale.getDefault(),"%1$te",data) );

System.out.println("Mês: " + String.format(Locale.getDefault(),"%1$tB",data) );

System.out.println("Ano: " + String.format(Locale.getDefault(),"%1$tY",data) );


Saída

Mes: Quinta-feira, 16. Fevereiro 2017
Dia da semana: Quinta-feira
Dia do mês: 16
Mês: Fevereiro
Ano: 2017
quinta-feira, 9 de fevereiro de 2017
@Asynchronous Methods
Fonte: http://tomee.apache.org/examples-trunk/async-methods/README.html
@Asynchronous Methods
@Asynchronous Methods
The @Asynchronous annotation was introduced in EJB 3.1 as a simple way of creating asynchronous processing.
Every time a method annotated
@Asynchronous is invoked by anyone it will immediately return regardless of how long the method actually takes. Each invocation returns a Future object that essentially starts out empty and will later have its value filled in by the container when the related method call actually completes. Returning a Future object is not required and @Asynchronous methods can of course return void.Example
Here, in
JobProcessorTest,final Future<String> red = processor.addJob("red"); proceeds to the next statement,final Future<String> orange = processor.addJob("orange");
without waiting for the addJob() method to complete. And later we could ask for the result using the
Future<?>.get() method likeassertEquals("blue", blue.get());
It waits for the processing to complete (if its not completed already) and gets the result. If you did not care about the result, you could simply have your asynchronous method as a void method.
Future Object from docs,
A Future represents the result of an asynchronous computation. Methods are provided to check if the computation is complete, to wait for its completion, and to retrieve the result of the computation. The result can only be retrieved using method get when the computation has completed, blocking if necessary until it is ready. Cancellation is performed by the cancel method. Additional methods are provided to determine if the task completed normally or was cancelled. Once a computation has completed, the computation cannot be cancelled. If you would like to use a Future for the sake of cancellability but not provide a usable result, you can declare types of the form Future and return null as a result of the underlying task
The code
@Singleton
public class JobProcessor {
@Asynchronous
@Lock(READ)
@AccessTimeout(-1)
public Future<String> addJob(String jobName) {

    // Pretend this job takes a while
    doSomeHeavyLifting();

    // Return our result
    return new AsyncResult<String>(jobName);
}

private void doSomeHeavyLifting() {
    try {
        Thread.sleep(SECONDS.toMillis(10));
    } catch (InterruptedException e) {
        Thread.interrupted();
        throw new IllegalStateException(e);
    }
  }
}
Test
public class JobProcessorTest extends TestCase {

public void test() throws Exception {

    final Context context = EJBContainer.createEJBContainer().getContext();

    final JobProcessor processor = (JobProcessor) context.lookup("java:global/async-methods/JobProcessor");

    final long start = System.nanoTime();

    // Queue up a bunch of work
    final Future<String> red = processor.addJob("red");
    final Future<String> orange = processor.addJob("orange");
    final Future<String> yellow = processor.addJob("yellow");
    final Future<String> green = processor.addJob("green");
    final Future<String> blue = processor.addJob("blue");
    final Future<String> violet = processor.addJob("violet");

    // Wait for the result -- 1 minute worth of work
    assertEquals("blue", blue.get());
    assertEquals("orange", orange.get());
    assertEquals("green", green.get());
    assertEquals("red", red.get());
    assertEquals("yellow", yellow.get());
    assertEquals("violet", violet.get());

    // How long did it take?
    final long total = TimeUnit.NANOSECONDS.toSeconds(System.nanoTime() - start);

    // Execution should be around 9 - 21 seconds
    // The execution time depends on the number of threads available for asynchronous execution.
    // In the best case it is 10s plus some minimal processing time.
    assertTrue("Expected > 9 but was: " + total, total > 9);
    assertTrue("Expected < 21 but was: " + total, total < 21);

  }
}
Running
-------------------------------------------------------
 T E S T S
-------------------------------------------------------
Running org.superbiz.async.JobProcessorTest
Apache OpenEJB 4.0.0-SNAPSHOT    build: 20110801-04:02
http://tomee.apache.org/
INFO - openejb.home = G:\Workspace\fullproject\openejb3\examples\async-methods
INFO - openejb.base = G:\Workspace\fullproject\openejb3\examples\async-methods
INFO - Using 'javax.ejb.embeddable.EJBContainer=true'
INFO - Configuring Service(id=Default Security Service, type=SecurityService, provider-id=Default Security Service)
INFO - Configuring Service(id=Default Transaction Manager, type=TransactionManager, provider-id=Default Transaction Manager)
INFO - Found EjbModule in classpath: g:\Workspace\fullproject\openejb3\examples\async-methods\target\classes
INFO - Beginning load: g:\Workspace\fullproject\openejb3\examples\async-methods\target\classes
INFO - Configuring enterprise application: g:\Workspace\fullproject\openejb3\examples\async-methods
INFO - Configuring Service(id=Default Singleton Container, type=Container, provider-id=Default Singleton Container)
INFO - Auto-creating a container for bean JobProcessor: Container(type=SINGLETON, id=Default Singleton Container)
INFO - Configuring Service(id=Default Managed Container, type=Container, provider-id=Default Managed Container)
INFO - Auto-creating a container for bean org.superbiz.async.JobProcessorTest: Container(type=MANAGED, id=Default Managed Container)
INFO - Enterprise application "g:\Workspace\fullproject\openejb3\examples\async-methods" loaded.
INFO - Assembling app: g:\Workspace\fullproject\openejb3\examples\async-methods
INFO - Jndi(name="java:global/async-methods/JobProcessor!org.superbiz.async.JobProcessor")
INFO - Jndi(name="java:global/async-methods/JobProcessor")
INFO - Jndi(name="java:global/EjbModule100568296/org.superbiz.async.JobProcessorTest!org.superbiz.async.JobProcessorTest")
INFO - Jndi(name="java:global/EjbModule100568296/org.superbiz.async.JobProcessorTest")
INFO - Created Ejb(deployment-id=org.superbiz.async.JobProcessorTest, ejb-name=org.superbiz.async.JobProcessorTest, container=Default Managed Container)
INFO - Created Ejb(deployment-id=JobProcessor, ejb-name=JobProcessor, container=Default Singleton Container)
INFO - Started Ejb(deployment-id=org.superbiz.async.JobProcessorTest, ejb-name=org.superbiz.async.JobProcessorTest, container=Default Managed Container)
INFO - Started Ejb(deployment-id=JobProcessor, ejb-name=JobProcessor, container=Default Singleton Container)
INFO - Deployed Application(path=g:\Workspace\fullproject\openejb3\examples\async-methods)
Tests run: 1, Failures: 0, Errors: 0, Skipped: 0, Time elapsed: 13.305 sec

Results :

Tests run: 1, Failures: 0, Errors: 0, Skipped: 0

[INFO] ------------------------------------------------------------------------
[INFO] BUILD SUCCESS
[INFO] ------------------------------------------------------------------------
[INFO] Total time: 21.097s
[INFO] Finished at: Wed Aug 03 22:48:26 IST 2011
[INFO] Final Memory: 13M/145M
[INFO] ------------------------------------------------------------------------
How it works under the covers
Under the covers what makes this work is:
- The
JobProcessorthe caller sees is not actually an instance ofJobProcessor. Rather it's a subclass or proxy that has all the methods overridden. Methods that are supposed to be asynchronous are handled differently. - Calls to an asynchronous method simply result in a
Runnablebeing created that wraps the method and parameters you gave. This runnable is given to an Executor which is simply a work queue attached to a thread pool. - After adding the work to the queue, the proxied version of the method returns an implementation of
Futurethat is linked to theRunnablewhich is now waiting on the queue. - When the
Runnablefinally executes the method on the realJobProcessorinstance, it will take the return value and set it into theFuturemaking it available to the caller.
Important to note that the
AsyncResult object the JobProcessor returns is not the same Future object the caller is holding. It would have been neat if the real JobProcessor could just return String and the caller's version of JobProcessor could return Future<String>, but we didn't see any way to do that without adding more complexity. So the AsyncResult is a simple wrapper object. The container will pull the String out, throw the AsyncResult away, then put the String in the real Future that the caller is holding.
To get progress along the way, simply pass a thread-safe object like AtomicInteger to the
@Asynchronous method and have the bean code periodically update it with the percent complete.Related Examples
For complex asynchronous processing, JavaEE's answer is
@MessageDrivenBean. Have a look at the simple-mdb exampleAPIs Used
- javax.ejb.AccessTimeout
- javax.ejb.AsyncResult
- javax.ejb.Asynchronous
- javax.ejb.Lock
- javax.ejb.LockType.READ
- javax.ejb.Singleton
- javax.ejb.embeddable.EJBContainer
- javax.naming.Context
Source
- Apache async-methods
- Github async-methods
svn co http://svn.apache.org/repos/asf/tomee/tomee/trunk/examples/async-methods
cd async-methods
mvn clean install
quarta-feira, 8 de fevereiro de 2017
PostgreSql Backup/Restore
Fonte: http://tsdn.tecnospeed.com.br/blog-do-desenvolvimento-tecnospeed/post/como-fazer-o-backup-e-restore-do-banco-postgresql
Como fazer o backup binário do banco postgres
O banco de dados PostgreSQL nos disponibiliza algumas ferramentas, que são pequenos executáveis que fazem esse serviço de backup e restore.
Através do prompt de comando:
- Localize a pasta de instalação do PostgreSQL (c:\Arquivos de Programas\PostgreSQL\9.0\bin) especificamente a basta bin, dentro dela está localizado o executável pg_dump.exe que fará a exportação (dump).
- Digite o comando: pg_dump.exe --host localhost --port 5432 --username postgres --format tar --file c:\nome_arquivo_que_sera_gerado.backup ManagerEDoc
O comando é auto explicativo, porém vamos ver em mais detalhes:
--host localhost : define o local onde o banco se encontra, pode ser localmente ou externamente em outra rede.
--port 5432 : é definida a porta utilizada, nesse caso a padrão postgres 5432.
--username postgres : define qual é o usuário utilizado na comunicação.
--format tar : o tipo de compressão do arquivo gerado.
--file nomedoarquivo.backup : define com qual nome e caminho completo do arquivo que será gerado.
ManagerEDoc : por último vai o nome do banco que se estará exportando, atenção neste ponto, pois é case sensitive, ou seja ele considera letras maiúsculas e minúsculas.
- Pronto, basta executar o comando e verificar se o arquivo exportado, está conforme definido no nome do arquivo.
Como fazer o restore binário do banco postgres
Através do prompt de comando:
- Localize a pasta de instalação do PostgreSQL (c:\Arquivos de Programas\PostgreSQL\9.0\bin) especificamente a basta bin, dentro dela está localizado o executável pg_restore.exe que fará o restore.
- Digite o comando: pg_restore.exe --host localhost --port 5432 --username postgres --dbname ManagerEDoc c:\nome_arquivo_exportado.backup
O comando é auto explicativo, porém vamos ver em mais detalhes:
--host localhost : define o local onde o banco se encontra, pode ser localmente ou externamente em outra rede.
--port 5432 : é definida a porta utilizada, nesse caso a padrão postgres 5432.
--username postgres : define qual é o usuário utilizado na comunicação.
--dbname ManagerEDoc : o nome do banco que se estará exportando, atenção neste ponto, pois é case sensitive, ou seja ele considera letras maiúsculas e minúsculas.
por último, vai o caminho completo do arquivo que deseja restaurar.
- Pronto, basta executar o comando e verificar se o banco foi restaurado com sucesso.
Como realizar a exportação do sql de um banco com inserts
Este modo de dump, é arriscado pois muitas tabelas possuem relacionamentos, handles e sequences em andamento o que pode comprometer inserir em um novo banco de dados, porém pode ser útil em determinado momento.
Ele consiste em fazer o dump de uma tabela em específico, segue abaixo um exemplo do comando.
Ele consiste em fazer o dump de uma tabela em específico, segue abaixo um exemplo do comando.
1 - Localize a pasta de instalação do PostgreSQL (c:\Arquivos de Programas\PostgreSQL\9.0\bin) especificamente a basta bin, dentro dela está localizado o executável pg_dump.exe que fará a exportação (dump).
2 - Estando lá, basta executar o seguinte comando:
pg_dump.exe --host localhost --port 5432 --username postgres --format plain --data-only --inserts --column-inserts --table "public.\"TspdNFCe\"" --file c:\TspdNFCe.sql ManagerEDoc
2 - Estando lá, basta executar o seguinte comando:
pg_dump.exe --host localhost --port 5432 --username postgres --format plain --data-only --inserts --column-inserts --table "public.\"TspdNFCe\"" --file c:\TspdNFCe.sql ManagerEDoc
O TspdNFCe se refere à qual tabela será feito dump
3 - Feito isso, será gerado o arquivo com todos os inserts da tabela solicitada, conforme definido.
3 - Feito isso, será gerado o arquivo com todos os inserts da tabela solicitada, conforme definido.
quinta-feira, 2 de fevereiro de 2017
Amazon EC2: Definir IP estático
Fonte: https://pragmaticintegrator.wordpress.com/2012/12/13/assign-a-fixed-ip-to-aws-ec2-instance/
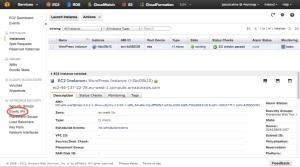
Assign a fixed IP to AWS EC2 instance
As described in my previous post the IP (and DNS) of your running EC2 AMI will change after a reboot of that instance. Of course this makes it very hard to make your applications on that machine available for the outside world, like in this case our WordPress blog. That is where Elastic IP comes to the rescue. With this feature you can assign a static IP to your instance.
Assign one to your application as follows:
Assign one to your application as follows:
- Click on the Elastic IPs link in the AWS Console
- Allocate a new address
- Associate the address with a running instance
- Note the IP being assigned to your instance

Right click to associate the IP with an instance:

Pick the instance to assign this IP to:
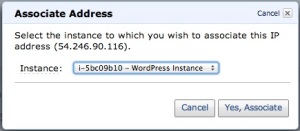
Pick the instance to assign this IP to:
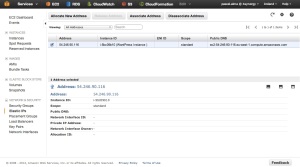
If you go to the IP address you were assigned then you see the home page of your server:

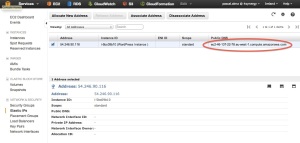
And the nicest thing is that if you stop and start your instance you will receive a new public DNS but your instance is still assigned to the elastic IP address:
One Important Note: As long as an Elastic IP address is associated with a running instance, there is no charge for it. However an address that is not associated with a running instance costs $0.01/hour. This prevents users from ‘reserving’ addresses while they are not being used.
Assinar:
Postagens (Atom)